Honda D Series Forum banner

JRSC (Jackson Racing Super Charger) 2021 Complete Reference

2 reading
66K views 117 replies 22 participants last post by  slo_eg8  
#1 · (Edited)
I'm starting this thread for everyone that may have purchased a Jackson Racing Super Charger for their D-Series in the past 5-6 years. I began my search for one over a year ago, and finally purchased mine off eBay for about $2,000. I've searched all the forums for as much relevant information as I can over the past 20 years and while there is a ton of great info, there is very little relevant current information and many links are dead or pictures are lost.

So I wanted to start a new discussion thread for those actually wanting to go down this road today.

Please do NOT tell me about how your Turbo is cheaper and makes more power and is much better than a SuperCharger. Feel free to post that on a different thread.

This is what I purchased. It was missing the alternator bracket, the FMU which I wasn't going to use anyways, and the various hoses and connectors. But the primary parts were all there and came with the fuel rail, injectors, throttle body. It also came with the unobtainable high boost crank pulley and the JR 3.4 pulley. I just wasn't sure how much of it would apply to my D16A6. I did just by chance happen to purchase an Alternator mount off a seller on Facebook Marketplace while searching locally for a JRSC prior to buying this kit off Ebay. It came with some extra parts that I weren't sure were even relevant to my application.


138398

Factory Installation Manual

Factory Parts

This is my CRX and info on my process

Lets begin with brochure which can still be found online.


138396


If you're looking for a CARB sticker, these are available on eBay for $40 + shipping
Search "Jackson racing supercharger carb legal decal sticker integra gsr rsx civic bb6"
I'm guessing they printed them off because the listing always says they have only 1 left.
The E.O.# D-344-10 is the latest one.

138397


1320 Performance on ebay has some tensioner parts and pulleys. They have more parts for B-Series.

California JRSC Owners?

Install Notes here on D-Series

Install Notes off D-Series (Installed May 11, 2000)
138701


JRSC for Noobies

MODDING
LHT is back to modifying the JRSC to be liquid cooled. At this time the price is $1195 to modify your manifold and S-tube.

Paterico's information is where I initially began researching from. He's got a ton of information on what has worked for him.

Rebuild Kits are available on ebay for $110
138399


Some pulley's can still be bought here and on ebay

Very Basic Understanding of the D-series JRSC kits. The Sebring labeled ones were the very first generation.

As soon as I received my purchase, I carefully documented what I had and what I was missing. The previous owner purchased it for his build, but sold the car and never installed it. So I had no idea of the actual history of the blower. The rotors were partially coated and there was some grind marks inside the housing. I smoothed the housing by sanding it with 320grit sand paper. The aluminum is pretty soft so it's not to hard. I used various tools to smooth it out and polish. Several people online mentioned that acetone can be used to strip the OEM coating off the rotors. I haven't tried that yet but that's my plan. I use a vapor steamer which worked as well but just very slowly.

138400


I've seen references to this diagram for how the super charger is installed but I didn't understand how the belts are routed.The diagram on the left shows the two belts on the back and front parts of the crank pulley. The second diagram shows both belts on the same part of the crank pulley. I couldn't find any information to clarify this.


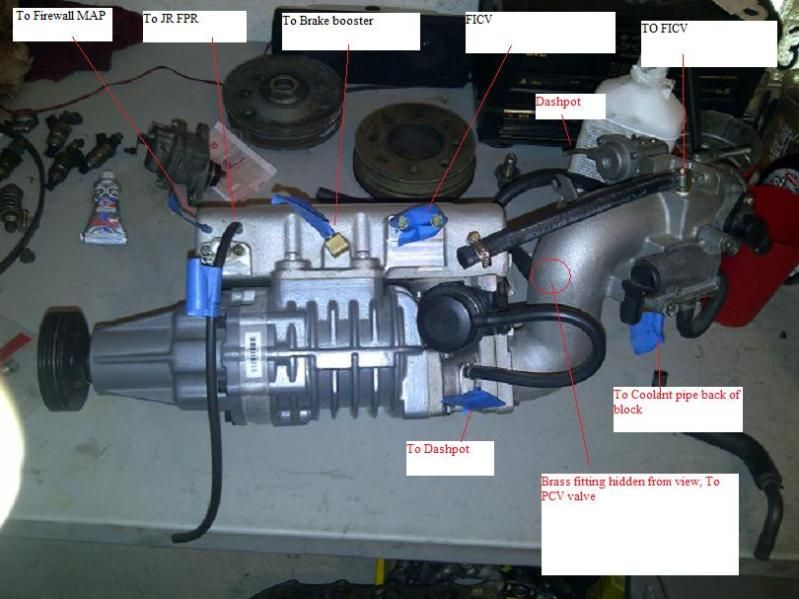
138401
 

Attachments

#42 ·
While I don't claim to be an expert on boosting, I do spend a lot of time researching and understanding how things work and I wanted to pass on what I've learned on this journey of supercharging my USDM 1991 CRX Si. Hopefully this guide will help you on your journey as well.

If you've been following this thread and maybe contemplating on installing your own JRSC, these are the steps to take.

First make sure your engine is running strong with no CEL's. The expectation is that I will gain 35-50HP from installing this supercharger on my stock engine. I performed a compression test to determine health of engine. My D16A6 engine measured 180psi dry and 210 psi wet. After performing the wet test, I realized my dry numbers may have been lower than optimal due to not cranking the engine enough. But the numbers were high enough not to care about further testing. All my cylinders were pretty close and none were drastically off. It should be obvious that boosting your engine will increase the pressure on your engine internals so you want to make sure it can withstand this.

138990
138991

138992


Acquire Jackson Racing Super Charger. Make sure it includes the parts you need. For D16A6, you need the tensioner bracket and preferably stock snout pulley. Offset alternator bracket isn’t needed for this setup. You will use the OEM Crank Pulley.

Paterico says "With the A6 crank pulley and a 3.2" blower pulley you're probably looking at 8lbs. I would encourage you to stick with the 3.4" blower pulley (if you have the A6 kit) and use a D16y8 crank pulley to get to around 8lbs of boost. Smaller pulleys are more prone to slippage, especially if you're using a 3-rib setup. I'm planning on using a D16y8 crank, 4-rib 3.2" blower pulley and a 4-rib D16y8 alternator pulley in my setup to make sure slippage isn't an issue."

Remember more power is made by increasing boost with a larger crank pulley and smaller snout pulley. The OEM crank pulley is dampened. There has always been much controversy on this but the general consensus for a daily driver is don’t change to a non dampened one unless you enjoy rebuilding engines.

Will you stay OBD0 or upgrade to OBD1?
I’m staying OBD0

Get a Windows laptop running Windows from the era 2000-2015

Chip your ECU
(I used Conrad_1974 who sells modified ECU's on eBay)
138993

Buy an emulator & chip programmer- I went with a Moates Ostrich 2.0
Decide software of choice for tuning- I decided to use Turbo Edit. Check out PGMFI for details.
Once you've gathered everything, then actually confirm everything works.
Swap ECU with chipped ECU
Download chipped ECU base map
to computer to verify you can read the chips (I could download but the map was modified with Tuner Express so I couldn’t open it with Turbo Edit.)
Transfer base map to Emulator
Plug Emulator into chipped socket
and verify car still runs normally. Battery in emulator lasts up to two years so technically you could just drive the car normally with the emulator plugged in

Install Wideband AFR. I used unused connectors in the under dash fuse panel and confirmed voltage with a voltmeter. I noticed when engine was on, gauge was on. When headlights turned on, gauge turned off. I thought maybe this power connector was used for daytime running lights or something that only works when the headlights are off. I decided to use a different ground and connect the yellow dimming wire to this and now when headlights are on the display dims as it should. I 3d printed a mount for my gauge. (The Lock/Unlock Switch is from a previous project that hasn't been refined yet for my door locks)
138995

Install Boost Gauge (Just needs 12v power and ground). I wanted my gauge to be hidden. I removed the silkscreen logo and "turbo" by sanding and polishing it off. Paint thinner actually melted the tinted plastic case. The plate the gauge is mounted to is a prototype 3D printing I'm working on.
138994


Next steps are to drain my engine coolant and prepare to remove the OEM Intake manifold.
 
#43 ·
So I drained the coolant by opening the radiator drain plug and removing the radiator cap. Then I began disconnecting hoses and connectors from my throttle body. I was incorrectly told that my D16A6 throttle body wouldn’t fit the JRSC so that fitment was in question until I could remove it and confirm it works
139000


My D16A6 throttle body

139001


My OEM throttle body gasket on the JRSC showing it fits fine. I may cut a new gasket.
139002
 
#44 ·
It took some effort to remove the intake manifold. I carefully removed all the hoses and connectors to the manifold. I broke the PCV so I had to order a replacement. Removing the IM wasn’t too bad. Removing the center nut was the hardest but using this combination, I was able to remove it without too much trouble in a few minutes. An electric ratchet helps save a lot of time in cramped

139005

139006
139007

Removing the bracket for the IM required unbolting 4 12mm bolts from underneath with a variety of extensions.
139008

Once the bracket bolts were removed it was just a matter of disconnecting this. the tab disconnected it fast.
139010


Lots of space
139011


139012

139013

Unclipping the injector wires require just lifting the two corners of the wire clips then it can be removed. Clips don’t need to be completely removed to unplug them.
139014


With the IM out, it’s time to move the parts I will be reusing on to the JRSC and making it fit my engine bay. I’m fully expecting to be missing parts and needing to clearance my shock tower. I bought a pneumatic hammer to make the process easier.
 
#45 ·
If you are new to installing a JRSC, then it’s a good idea to learn these terms! Today was spent transferring parts from my OEM intake manifold to the super charger. My JRSC came with some parts that weren’t meant for my generation of D Series. I also replaced the fuel filter. Removing the banjo bolts was easy with an impact wrench and a 17mm socket. No need to remove the service socket either.
139020


139021

The previous owner of the JRSC had this Idle Air Control Valve on but I needed to replace it with the one off my CRX. I cleaned the mesh screen inside

139022

Replaced
139023

This was helpful diagram
139024


I also rebuilt my DCM injectors. I can’t attach a pic to this post so will try another post.
 
#46 ·
How's it going just stumbled across this while looking for a carb sticker for my car..I've recently installed a jrsc kit on my daily 99 civic ex d16y8 stock making 8 pounds of pressure.. it was a pain tracking down any info when I started installation luckily I found a car that was being parted out and had a complete kit. Car had been posted for a year but post was active so I contacted the seller and boom was still available,guy's post was horrible but I'm glad it was I finally got my kit I've been wanting since my high school days when they were new..I'll post pics when I can,and try and help with any questions I can..
139335
 
#50 · (Edited)
I know it’s been nearly a year since my last post. I’ve been itching to get back to work but I have a dilemma. My car is due for smog in two months, so I may just get it all back together and pass smog then continue working on the JRSC install or I may continue with the install and put my car on Non Op until I can finish the work then get to work smogging it. Doing the first way means I have two years to refine my install which is probably the smart way. My problems really began when it changed from a JRSC install to “let’s replace everything” impacted by the JRSC first. Timing belt, alternator, AC compressor(was already faulty), Another issue is I’ve got a currently non running MK4 Supra I’ve been working on keeping me from this project which is on top of the 4 post lift.
Image
 
#53 ·
I have an update! I've spent the last week getting my CRX back together in stock form. To prepare for the JRSC install, I ended up installing a new alternator, new AC compressor, new throttle cable, new seals, new oil pan and gasket, all new air conditioning components from the evaporator to a new condenser, new timing belt, new water pump, tensioner, and then it came time to get a smog check lol. So I decided to reinstall my stock intake manifold, make sure my car runs normally. I have to take a break now for my wife's birthday tomorrow, but then I will begin pulling vacuum, filling fluids, and check for overall leaks (hopefully) not, and hopefully the timing is ok, although I plan to check the ignition timing as well. So my plan is once the car is running normally, get it smogged in the coming week or so and hopefully it passes as it's almost been just sitting on my rack since the last smog check lol. Then I will proceed to install the JRSC supercharger and this time with no more delays!
 
#54 ·
Finally got my CRX back to stock and will be going for smog in the next week or so. I’m happy that once I pass, moving forward in this journey will be much simpler as I will only be replacing the intake manifold. The headaches to get here was certainly worth it now that I have a keen understanding of my car.
 
#58 ·
In preparing for installing my JRSC Supercharger in my CRX Si, I've continued reading other peoples experiences. This is a great explanation for how Jackson Racing designed the SC to work using their "hacks". I am sharing this so new owners of the JRSC can understand how the FMU and Pressure Switch and Resister hack worked together. The quote comes from "Spawne32" on the Honda-Tech forum. "You have your FMU, and you have your pressure switch which is connected to a relay on the IAT. Your map is still in its factory location so it only reads vac, as it should. Now at this point, the car never knows its in boost, but what the JR fuel stuff does is, when you hit 1psi, the FMU begins to raise fuel pressure on a 5:1 ratio for every 1 pound of boost it see's. As the fuel pressure rises..." Read the whole post HERE
 
#59 ·
The DSM 450 injectors are a common upgrade but the seals won't fit without some trimming. I found that a Dremel tool with the little sander is almost the exact same diameter. It only need a little bit of trimming. I also used a sharp knife to trim it as sanding the rubber can be tricky.
Image


The injector seal lightly pressed onto the sander. All you have to do is hold the seal and turn on the Dremel tool to shave the inner diameter. It doesn't need much. I did a little bit, then flipped it around and did it some more from the other side.
Image


Image

After doing this without gloves I decided it was smarter to put some on.
Image


Testing the fit on the injectors
Image


Image

Fitting all the injectors with the seals.
Image


Next up is to check the flow of each injector and giving them a thorough cleaning.
 

Attachments

#60 ·
I was saddened to learn yesterday that Moates decided to stop producing their products. I'm thankful to have purchased their Ostrich 2.0 and burners when I had the chance.

Farewell Message
22 November, 2022

Holiday Greetings!

As we move into the end of 2022, we sincerely want to say "THANK YOU ALL" for support and patronage. It's been a thrill helping folks with their efforts, and we've truly appreciated the opportunities to socialize, exchange ideas, learn, teach, and facilitate along the way.

We're closing down the webstore and related operations so that we can pursue the balance of our lives in different areas. There are several challenges that have led us to this decision, and we hope you can all appreciate the following:

The headwinds of production supply shortages have cut our supply lines to the marrow. Many components we've used have lead times of a year or more, with costs having increased significantly along the way. There's no end in sight, and we don't want to sacrifice quality with questionable sourcing or chase the costs by increasing prices.

We've been doing this for a while now, and we're tired and getting older. It's time for us to take a step back and focus on health, family, and overall wellness. Running Moates.net has taken a tremendous amount of time, which is a limited resource and in short supply. Between arthritis and chronic pain of hands, backs, and other various injuries of body parts, it is a challenge to physically perform tasks needed to keep things going and we need to change what we are doing to improve our quality of life.

We wish you the best on all your projects, whatever they may become. It's been an amazing experience, and again, we truly appreciate you all as we take this step!


Giving thanks,

Craig, Bonnie, and Dave
 
#66 ·
Today was the day to begin my JRSC install. I received my registration renewal yesterday
since I passed smog. I unplugged my battery, drained the coolant, pulled the ECU fuse, and began unplugging all the hoses and removing the intake manifold. The last time I did all the work, the car was on my lift, but now its on the ground with a crowded shop, so removing the IM bracket/brace is a lot more difficult. However a metal splinter in my finger stopped all work for the day. Tomorrow, I will get the bracket off, and the IM will come loose as I have removed all the nuts already. Can't wait to finally get going on the next phase.
Image
 
#67 ·
Finally got the intake manifold out today. The support bracket was difficult to remove from the top but I eventually got it off.
Image


I dropped the JRSC into place to see how it fit. Fortunately the snout pulley had plenty of clearance but the alternator pulley and the tensioner pulleys absolutely needed clearancing. Having read the usual way to do this is with a large hammer and a torch, I planned for a different process with a small air hammer and an induction heater to focus the heat on just the area I needed without an open flame. Combining the two it only took about 10 minutes of shaping before it fit.
Image


Checking clearance of tensioner pulley before shaping, not much room at all.

Image

Image

I tried air hammering first and it worked very slowly so I decided to use my induction heater and within a few minutes I was hammering and shaping it instantly.

Image

Air hammer works with just 90psi.

Image

I believe this is enough clearance for the pulley to slip a belt here. Alternator also clears fine.
 
#68 ·
I have a goal, to have my JRSC installed and driving by this Sunday. Unfortunately my shop is full so it’s not getting the priority I want to give it. However I’m making progress daily little by little. I used self etching primer on the exposed metal after shaping it, then added some red paint. Then reinstalled the alternator and JRSC tensioner bracket. I modified the fuel rail with my Dremel and DSM injector seals to fit the SC. I’m extending wires for the TA sensor and I believe Fast idle before I drop the SC back in. I spent a lot of time identifying all the hose connections as well. I will post details of this soon.
Image
Image

Image

Image

Image
 
#69 ·
I installed and removed the SC several times today checking for clearance and positioning. The alternator was pressing pretty hard against the bottom of the SC, so I decided to see if I could shorten the post after confirming that rotating it wasn’t really an easy option. I confirmed all hose locations and checked to see how much I need to modify my intake tubing. Pretty much the only gotcha was the return fuel line from my FPR. Since my OEM rail couldn’t be used the FPR was moved to the opposite side of the fuel rail meaning the hose was now too short. I decided to get a barbed Union to go from 5/16” to 1/4” id hose. Then I can reconnect the return fuel line.
Image

Image

Image

before modifying alternator
Image

trimming alternator post
Image

Alternator post shortened
Image
 
#70 ·
I accomplished my goal. I got the SC in, no leaks, no extra parts, everything is solid, I swapped ECUs to my chipped emulator, I added fluid, started her up and she ran a little rough which I expected with the 450cc injectors…but turned it off immediately to check for any gas or coolant leaks. Looking at the supercharger belt, I noticed it looked funny, like it wasn’t centered on the pulley. Then I realized what happened. I clearanced the engine bay for the pulleys but not the belt!!! So the belt was rubbing against the engine bay as it came down from the supercharger snout pulley. Not good but it’s fixable. Just have to remove it all again.
Image

Image
Image

Image